Showing posts with label seafood. Show all posts

Saturday, October 24, 2009

Pan Roasted Sea Bass


The kids wanted pizza the other night, which was fine, but I was definitely craving something a little more.. uhh.. not pizza. So I stopped by my favorite fish market to see what they had on hand. Sea bass... yeah, that was definitely better than pizza! I picked up a half pound of the sea bass and some steamers and was happily on my way to a nice grown up dinner.

As you can see from the picture, sea bass filets are very thick, so if you're used to cooking thinner filets, this can pose some interesting challenges. One of the best ways I've found to conquer this challenge, and also create a wonderful flavor and texture is by pan roasting it. Pan roasting will create a beautiful crust on the fish (or any thick cut of meat) and leave the inside moist and tender. Trust me, you gotta try this!

skinless sea bass filets, cut into about 4 oz pieces
canola oil (or another oil with a high smoke point)
desired seasonings (try to avoid herbs, they'll burn.. salt and pepper will do more than you think here)
oven proof skillet

Preheat the oven to 450ºF about 10 minutes before you start.

Heat the canola oil in the oven proof skillet until it's very hot, almost to the smoke point (the oil will seem to shimmer).

Season the fish with salt and pepper, cajun seasoning is also good. Place in hot skillet and let it sear (don't crowd the pan, make sure the pan is large enough to accomodate the fish without the pieces touching, if the pieces don't have enough space, you won't be able to get a sear). Don't try to turn the fish too soon or it will stick to the pan and you won't get that nice crust. This should take about 3 minutes or so. Turn the fish with a flexible spatula and allow to begin searing on the other side about 1-2 minutes. Remove the pan from the heat and place in preheated oven. Cook fish until it flakes easily with a fork (the 8oz filet I had took about 12 minutes).

Serve with your favorite sauce (lemon butter, white wine reduction, etc).

Monday, September 07, 2009

Baked Salmon


Ok Mr. Peabody, fire up the wayback machine! (extra points for anyone who can tell me what that references).

Salmon wasn't a fish I was familiar with until I was probably in my early 20's. I grew up in the 70's, in a small New England town, there just wasn't a lot of crossover food from other areas... ethnic aisle in the grocery store?? Huh, what do you mean ethnic? The only ethnic food around came from a few small grocers who specialized in Portuguese, Greek or Italian food (the 3 major ethnic populations in the area back then), and you had to go to the "city" to get that. And, even though salmon isn't considered to be associated with any particular ethnic group, it certainly wasn't a New England fish. I imagine Maine lobster didn't make too many appearance on the northwest coast of the US back in those days either. Ok, I'm rambling (isn't that the first sign of getting old??).

Regardless of all of the above, salmon didn't make it's way into my life until I moved to Florida in the early 90's. I remember my mother making it for dinner one night and I instantly fell in love with the moist, flaky texture, and the rich flavor that seemed to be able to handle even the strongest flavor enhancements without losing it's character. Yes, salmon and I had a definite future together.

***Flash Forward***

This is now my go to fish. It's wonderful baked, broiled, fried, in salads, and it even holds its own on the grill. The big kicker, though, is that my kids love it... and it's actually GOOD for them (shh... no telling!). Anyway, here's my favorite way to prepare it, this works well on the grill as well... just set the fish on a piece of foil with the sides and ends rolled up so the "sauce" doesn't drip into the fire.

1 salmon filet (for the 5 of us I buy a 1.5lb filet)
1/4 soy sauce
1/4 cup lemon juice
1/4 cup white wine
salt, onion salt, garlic salt, black pepper
butter

Preheat the oven to 375ºF. Lightly rinse the salmon filet to remove any scales from the flesh of the fish and then place in a ziploc bag.

Mix together the soy sauce, lemon juice and white wine, pour half into the ziploc bag with the salmon. Let this marinate for 20 minutes.

Place salmon filet in a glass baking dish with the marinade from the bag. Bake for 10-12 minutes, until the fish is almost done. Pour the remaining marinade over the fish and dot the top with pats of butter (for 1.5 lbs I use about 3 Tbs of butter). Continue baking until the fish flakes easily with a fork in the center of the thickest part of the filet (usually another 5-10 minutes, depending on how thick the piece of fish is).

To serve, cut the salmon into serving size pieces and spoon a little of the pan juices over the fish.

Sunday, October 26, 2008

Honey Walnut Shrimp


A few years ago, back when we actually had the time and money to go out to dinner, Erich ordered Honey Walnut Shrimp at our favorite Chinese place. It was SO good, deep fried shrimp with a light crispy coating and toasted walnuts drizzled in a creamy, sweet sauce. I made a mental note that I needed to learn how to make it, and... I just got around to that last week. It came out really well, the saltiness of the shrimp and mild onion flavor from the green onions contrast nicely with the sweetness of the sauce and walnuts. This is a great recipe to make if you have kids who like seafood.... and mine do. I doubled this recipe and there was NOTHING left.

1 Tbs butter
1/2 cup walnuts
1 tsp brown sugar
pinch of salt

Melt the butter over medium heat in a small saute pan. Add the walnuts and saute for 1 minute. Sprinkle brown sugar and salt over nuts and stir to coat. Continue cooking 1 more minute, stirring constantly. Remove from heat and set aside.

2/3 cup rice flour (if you can't find rice flour, cornstarch will work)
3 eggs, beaten
salt and pepper to taste
1 lb large shrimp, peeled and deveined
1/4 cup mayonnaise
1 Tbs honey
2 Tbs sweetened condensed milk
1 Tbs rice vinegar
3 green onions, chopped
oil for frying

Heat 2 inches of oil in a heavy skillet or electric skillet to 350ºF. Mix beaten egg, rice flour and salt and pepper in a medium mixing bowl. Toss shrimp in batter mixture and deep fry a few pieces at a time until golden brown, about 3 minutes. Drain on paper towels.

Mix together mayonnaise, honey, condensed milk and rice vinegar.

To serve, place shrimp on a plate, sprinkle with walnuts and drizzle with the sauce. Top with green onions to taste.

Sunday, September 21, 2008

Grilled Shrimp


Grilled shrimp, it can be great or just ok, and sometimes even really bad. For a long time we stayed away from making shrimp on the grill because it usually came out very dry and tough, then I found an article on brining shrimp before grilling, and we decided to give it one more shot. Not only did our shrimp come out great that time, it comes out great EVERY time. The shrimp takes on an entirely different texture, almost like lobster, it's, for lack of a better word, awesome.

There is one other little trick, leave the shell on. To make this easier, we buy EZ-Peel shrimp, the shell is slit down the back and the shrimp has been deveined already. If you absolutely can't stand the thought of leaving the shell on, go ahead and remove it, but it will result in slightly drier shrimp.


The Brine

1 qt water
1/3 cup kosher salt
1/3 cup brown sugar
1 tsp cajun seasoning (optional)
ice
1 lb large shrimp, shells on

Stir the salt, sugar and seasoning into the water in a large bowl until both dissolve. If you're using fresh shrimp add about 2 cups of ice. If you're using frozen shrimp just add them straight to the brine (they'll thaw in the brine by the time you're ready to cook). Cover the bowl and allow to sit for 30 minutes on the counter, or up to 2 hours in the fridge.

The Marinade

This part is really all up to you, as long as you add a little oil to your marinade, anything goes here. This is just the way we like to do it.

1/3 cup extra virgin olive oil
1/2 cup white wine
blackening seasoning and hot sauce to taste

Whisk all together, Drain the brine from the shrimp and rinse lightly, drain again and toss in marinade. Allow to sit for 10 minutes.

The Shrimp

Skewer the shrimp on metal or soaked bamboo skewers. Cook over a hot fire for 2-4 minutes per side (depending on the size of your shrimp).

This recipe doubles very easily, and you may want to go ahead and double it... the leftovers are wonderful in a salad or just to take for lunch the next day.

Friday, September 12, 2008

Fish Tacos


When I first heard of fish tacos, I was on a business trip in Southern California. I have to admit, my first thought was... ewww, GROSS! Then, I happened to walk by the entrance to a restaurant that specialized in fish tacos... the wonderful smells coming from inside were enough to persuade me to try one and I was hooked. Unfortunately, at the time, fish tacos hadn't quite made their way to my small town in Florida, so I had to learn to make them myself. I also had a lot of convincing to do as far as my family was concerned, but they're brave souls and fairly accustomed to my experimenting... so now they're hooked too.

Fair warning, I think there are about 5 million calories in one of these... just so you know :)

1 lb fresh mahi mahi (you can really use just about any fish you like though)
1 1/2 cups all purpose flour
12 oz bottle of good beer
1 tsp sugar
1 tsp salt
1 tsp adobo seasoning
1/4 tsp cayenne pepper
Mexican cream sauce (recipe follows)
salsa or pico de gallo
2 cups shredded cabbage
crispy taco shells or soft flour tortillas
oil or shortening for deep frying

Preheat enough oil to cover fish in an electric frying pan or deep fryer, to 375ºF.

Cut mahi mahi into 1/2 inch cubes.

In a large bowl, whisk together flour, sugar, salt, adobo, cayenne and enough beer to make the batter slightly thinner than pancake batter.

Dip fish pieces in batter, then drop into hot oil, being careful not to crowd the pan (I usually do about 10 pieces at a time). Fry until golden brown, about 3-4 minutes, and then drain on paper towels.

When fish pieces have cooled slightly, fill taco shells or tortillas with a few pieces of the fish, some cream sauce, salsa and shredded cabbage.

Mexican Cream Sauce

1/2 cup mayonnaise
1/2 cup sour cream or plain yogurt
1/4 tsp adobo seasoning
2 Tbs finely chopped fresh cilantro
1/2 tsp dried oregano
juice of 1/2 lime

Mix all ingredients together. Refrigerate covered at least 1 hour before using.

This sauce is also excellent with regular tacos.

Sunday, July 06, 2008

Clams Casino


One of the advantages of growing up on the New England coast was the seafood. In the summer clams were a staple. Whether it was my grandmother's clam chowder at a family picnic or steamers on a night when my parents just felt like eating outside... we ate a LOT of clams back then.

Now that I live in Florida, I can still get some of those New England clams, but it comes at a slightly steeper price these days, so I tend to reserve the clam consumption for days like the 4th of July. On Thursday I stopped by the best seafood market in town (best because they fly clams and lobster in daily from New England) and picked up some beautiful steamers and chowder clams, as well as some Florida little necks. On Friday, we had a clam feast... Rhode Island style chowder, steamers with drawn butter and... these wonderful little things. This is my father's recipe for clams casino.

1/2 stick butter
1/2 red bell pepper, chopped
1/2 green bell pepper, chopped
1-2 cloves garlic, minced
2-3 doz small hard shell clams (like little necks)
Italian style bread crumbs (optional)
8 slices of bacon, partially cooked and cut into 1" pieces

Preheat broiler.

Melt butter over low heat in a small pan. Add chopped peppers, onions and garlic and cook for 2 or 3 minutes, just until vegetables are tender crisp. Set aside to cool.

Pour about 1/2" of kosher salt on a baking pan large enough to hold all the clams. Shuck fresh clams over a large bowl to catch the liquid. Discard top half of the shell and place bottom half with the clam onto the salt (this will keep the clams straight, and keep them from spilling the butter). Spoon a little of the butter and vegetable mixture into each clam shell and top with a sprinkling of bread crumbs and partially cooked bacon.

Place clams under broiler, about 6 inches from the heat and broil about 4 minutes, or just until the bacon crisps up. Allow to cool for about 10 minutes before serving.

Saturday, May 24, 2008

Lobster Bisque: Heaven in a Bowl


It's a little ironic that my first post is lobster bisque. There was a time when culinary achievement for me was not burning something in my crockpot, my how things have changed! This really isn't a difficult recipe, but it is a bit involved and time consuming.... keeping that in mind, please know that you will not be sorry with the investment. Ok, let's get started!

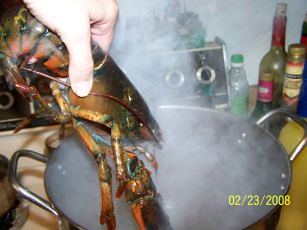
Meet my friends Ethel and Fred! They're each about a pound and a quarter to a pound and a half.


We're just going to let them hang out in the sink and say their goodbyes while we bring a large pot of water to a boil. When I say a large pot, I mean LARGE. I used an 18 qt stockpot that was about 2/3 full.

Once the water is boiling, take your friends and just drop 'em in head first. Seriously... just drop 'em in... it's ok... you can do it. Once the water returns to a boil, let them cook about 10 minutes.


After 10 minutes, fish out your little buddies and let them cook in a strainer in the sink until they're cool enough to work with. This may take a little longer than you think. Keep in mind that when you crack Fred and Ethel apart they'll be full of hot liquid... so if you think they're cool enough, give it another 10 or 15 minutes. While you're waiting, go ahead and cut a few carrots, some celery, garlic and onions into large chunks and throw them into the water in your stockpot. Turn the heat back on to high til it starts boiling again, then turn the heat down and let it begin simmering.

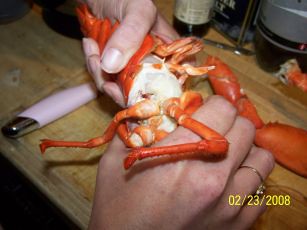
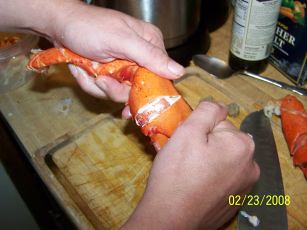
Now it's time to clean the lobsters. To start, separate the claws and tail from the body, just twist them right off.


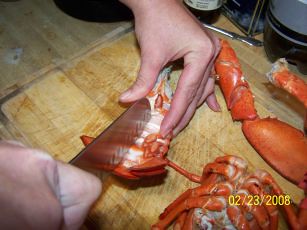
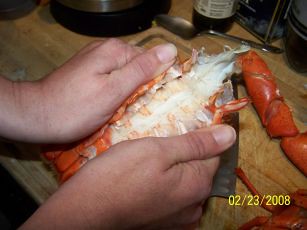
The easiest way to remove the meat from the tail is to slice down the middle of the underside shell and then just pry it open with your hands. The meat will come right out in one piece.


Now for the claws. The best way I've found to crack lobster claws is to place the blade of a heavy knife on the flatter side of the claw and hit the top of the knife gently with your hand. This makes a crack in the shell and you can then just break it in half. When the claw meat is exposed, go ahead and grab the smaller claw and pull it out, this will remove the cartilage holding the meat in the claw.


Set the meat aside in the fridge until later. If you want you can go ahead and chop it now, but we don't really need to do that until later. Take the bodies and the shells and put them in your stockpot with the veggies you started simmering earlier. Let the stock simmer for at least 2 hours, I usually let mine cook down for around 3 hours. Strain through a fine mesh strainer lined with cheesecloth. What you'll have when you're done is a wonderful lobster stock that you can use in many seafood dishes. The great thing is that you won't need it all for this recipe, so put the leftover stock in ziploc freezer bags in 2 cup servings and freeze for later use. Just save 1 1/2 cups for this recipe. All of the above can be done a day or two ahead.

Ok, now let's make some bisque!

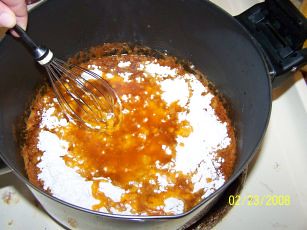
Start by melting 1/2 cup of butter in a large, heavy sauce pan. Stir in 1 Tbs of sweet paprika and then whisk in 1/2 cup of all purpose flour until smooth. This is what you'll start with:


and this is what you want to end up with:


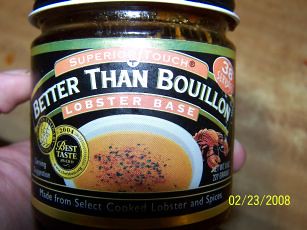
Keep whisking this over medium low heat for about 3 minutes to cook the flour. Next, get some of this (I usually find it in the soup aisle of the grocery store with the rest of the bouillon):


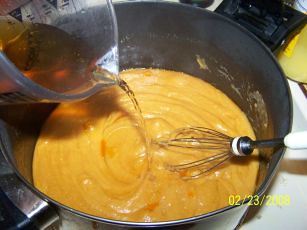
Measure out 1/4 cup and slowly dilute by pouring in a little of the reserved stock at a time. Trust me, do this slowly or you'll end up with a clumpy mess. Go ahead and mix in 1/4 cup of cream sherry, then slowly whisk the sherry/stock mixture into your roux until well combined.


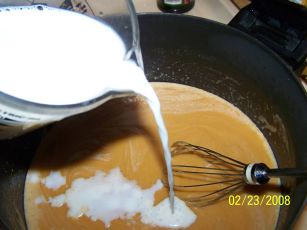
Next add in 4 cups of whole milk in the same manner, whisking it in slowly.


Heat this mixture through and add in 2 Tbs brandy and 1/4 to 1/2 cup of sugar (start with a 1/4 cup and then add to taste from there). Finish off your bisque with 1/2 cup of heavy cream and your chopped lobster meat. Now comes the hard part... trying not to eat it all before you get it to the table :) Enjoy!